Salesforce Marketing Cloud integration
This guide walks you through connecting Salesforce Marketing Cloud (SFMC) to Better Email, from creating the API package in SFMC to optionally syncing recipient fields for merge tags and segmentation.
Before you start
To connect SFMC, you will need:
- A Salesforce Marketing Cloud account with access to
SetupandInstalled Packages - Permission to create an installed package with a server-to-server API integration
- An admin user in Better Email who can create and edit integrations
Better Email connects to SFMC using the client_credentials flow. There is no user login, callback URL, or refresh token involved.
Setup
Use this section when you are connecting Salesforce Marketing Cloud to Better Email for the first time.
1. Create the API package in Salesforce Marketing Cloud
In Salesforce Marketing Cloud:
- Go to
Setup. - Open
Installed Packages. - Create a new package, for example
Better Email. - Add a component of type
API Integration. - Choose
Server-to-Server.
SFMC will generate the credentials Better Email needs:
Client IDClient Secret- Tenant-specific API endpoints
Important:
- The package component must be
Server-to-Server, not another integration type. - The package must remain installed and enabled in the SFMC account or business unit your team is using.
- If you later rotate the client secret in SFMC, update the secret in Better Email too.
2. Copy the values Better Email needs
From the installed package, copy these values into Better Email:
Client IDClient Secret- Your tenant subdomain
- Optional: your target business unit
MID/account_id
For the subdomain, use only the tenant identifier, not the full URL.
Example:
- Auth Base URI:
https://mc563885gzs27c5t9-63k636ttgm.auth.marketingcloudapis.com - Subdomain to enter in Better Email:
mc563885gzs27c5t9-63k636ttgm
If Better Email shows an SFMC authorization error right away when exporting or fetching field sources, double-check these three values first. A wrong subdomain, stale client secret, or package that is not enabled in the correct SFMC account can all cause token requests to fail before any export or field sync happens.
If the installed package is enabled only for a specific SFMC business unit, also copy that business unit's MID and enter it in Better Email as Business Unit MID (optional). Better Email sends this value as account_id when requesting the SFMC access token so the token is issued in the correct business unit context.
3. Enable the required SFMC permissions
Use these scopes as the baseline for the integration:
saved_content_readsaved_content_writedocuments_and_images_readdocuments_and_images_writeemail_reademail_writedata_extensions_read
If you also want Better Email to access SFMC tracking and performance data, add:
tracking_events_read
If you plan to sync recipient fields from SFMC into Better Email, data_extensions_read is required. In practice, email_read is also needed for fetching Contact Builder field sources. Depending on how your SFMC account is structured, you may also need access to the relevant Contact Builder and Data Extension resources used by your team.
4. Set up the integration in Better Email
In Better Email:
- Go to
Integrations. - Create a new integration.
- Enter a name for the integration.
- Choose
Salesforce Marketing Cloudas the type. - Optional: under
Access, restrict the integration to specific users or groups in your organization. - Save the integration.
- After saving, fill in:
SubdomainClient IDClient SecretBusiness Unit MID (optional)if the package is enabled only for a specific business unit
- Enable the integration.
- Save the integration again.
If you leave Access open, the integration is available to everyone in the organization. If you restrict it, only the selected users or groups, plus admins, will be able to use it in Better Email.
You can also optionally configure:
Only show categories under these parent IDsDefault subjectDefault preheaderMinify
Only show categories under these parent IDs limits the folder picker during export so users only see categories under specific SFMC parent folders. Enter a comma-separated list of SFMC category IDs if you want to restrict users to a specific part of the Content Builder folder tree. Leave it blank to show all categories.
Once saved, Better Email can request access tokens from SFMC as needed and export email assets into Content Builder.
Using SFMC in Better Email
This section covers ongoing behavior after the integration is connected.
Define export subject lines and preheaders in the email editor
By default, users enter the Subject and Preheader in the SFMC export dialog when they export an email.
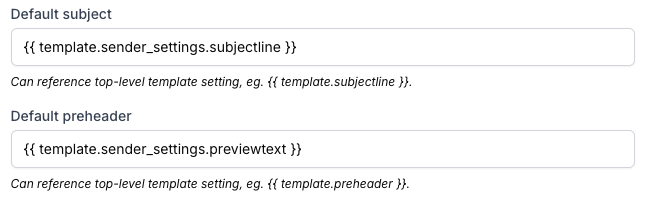
If you want those values to come from the email's global settings instead, set Default subject and Default preheader on the SFMC integration to reference the relevant email setting fields.
For example:
Default subject:{{ template.sender_settings.subjectline }}Default preheader:{{ template.sender_settings.previewtext }}
With this setup:
- The subject line and preheader are managed from the email editor instead of being typed manually at export time.
- When the export dialog opens, Better Email resolves the configured references from the email settings.
- If those settings have values, the export dialog shows the resolved subject line and preheader from the email.
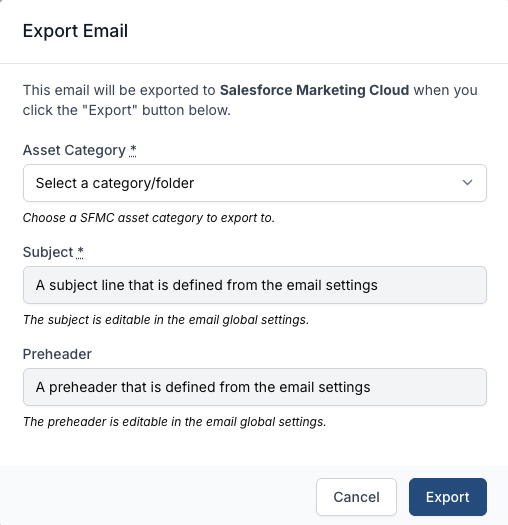
This is useful when subject lines and preheaders should be defined as part of the email itself, while still being exported into Salesforce Marketing Cloud.
Use AMPscript personalization in links
A common SFMC workflow is sending each recipient a link that includes their own member ID, account ID, or another personalization value. For example, a marketer might want every recipient's "Manage account" button to point at:
https://www.example.com/account?member=%%=v(@MemberID)=%%
You can paste a URL like that straight into a Link input or into a rich text link inside a Multi-line Text field. Better Email accepts AMPscript and Liquid expressions in URLs, so the value will not be rejected as invalid.
How the link is rewritten for SFMC
When an email is rendered for an SFMC integration (in preview, export, or send), Better Email looks at every <a href> in the final HTML. If the href contains AMPscript, it is rewritten to:
%%=RedirectTo(TreatAsContent(...))=%%
So the example above becomes something like:
%%=RedirectTo(TreatAsContent(Concat('https://www.example.com/account?member=','%','%','=v(@MemberID)=','%','%')))=%%
This is the pattern SFMC expects for personalized destinations. Without it, SFMC's click tracking and Object Management Model can break the link or strip the personalization at send time.
A few useful things to know about this behavior:
- It runs on the final rendered HTML, so it covers anchor tags from Link inputs, links inside Multi-line Text fields, and any anchor tags written directly in the template.
- It only applies when the active integration is Salesforce Marketing Cloud. Other integrations are unaffected.
- It only triggers when the
hrefcontains AMPscript (%%=...=%%or%%[...]%%). Plain URLs and Liquid expressions are left alone, since Liquid is already resolved before this step. - If a link's
hrefis already wrapped inRedirectTo(...), Better Email does not double-wrap it.
Merge tags work the same way
Most marketers will not type AMPscript by hand — they will use a Better Email merge tag instead. Merge tags resolve to AMPscript before the link rewrite runs, so personalized URLs end up wrapped exactly the same way.
For example, if your SFMC integration maps the [member_id] merge tag to:
%%=AttributeValue("MemberId")=%%
and a marketer enters this into a Link input:
https://www.example.com/account?member=[member_id]
then at render time Better Email:
-
Replaces
[member_id]with its AMPscript value, producing:https://www.example.com/account?member=%%=AttributeValue("MemberId")=%% -
Detects AMPscript in the
hrefand rewrites the anchor to:%%=RedirectTo(TreatAsContent(Concat('https://www.example.com/account?member=','%','%','=AttributeValue("MemberId")=','%','%')))=%%
So marketers can keep using the familiar [merge_tag] syntax in URLs and still get the SFMC-safe RedirectTo(TreatAsContent(...)) output automatically.
Optional Liquid filters
If you need explicit control inside a template, three SFMC-specific Liquid filters are available:
| Filter | Use it for | Wraps with |
|---|---|---|
ampscript_link | href values where you want SFMC click tracking on personalized URLs | RedirectTo(TreatAsContent(...)) |
ampscript_content | Places like src, plain text, or anywhere you want personalization treated as content rather than markup | TreatAsContent(...) |
ampscript_escape | When you just need a safely escaped AMPscript expression and want to wrap it yourself | nothing — returns the bare AMPscript expression |
Example:
<a href="{{ cta.url | ampscript_link }}">View account</a>
<img src="{{ hero.image.url | ampscript_content }}" />
For Link input hrefs, you usually do not need ampscript_link — the automatic rewrite covers them. Reach for the filters when you are rendering AMPscript into something other than an href, or when you want the wrapping behavior to be explicit in the template.
For non-SFMC integrations the filters fall through to the original value, so the same template can be exported to other ESPs without changes.
Sync recipient fields from SFMC
Better Email can sync recipient fields from Salesforce Marketing Cloud so they can be used for merge tags and segmentation.
Turn on recipient field sync
- Open the SFMC integration in Better Email.
- Turn on
Sync recipient fields. - Save the integration.
Choose which Contact Builder attribute sets to sync
After saving the integration:
- Click
Fetch available field sources. - Better Email loads the available Contact Builder attribute sets from SFMC.
- Select the attribute sets you want to sync.
- Save the integration again.
If no attribute sets are selected, Better Email treats that as "sync all available attribute sets".
This step uses Salesforce Marketing Cloud's Contact Builder attribute set API. It can fail even when email export works, because export uses Content Builder endpoints while field-source fetching depends on access to Contact Builder resources for the relevant SFMC account or business unit. In our testing, a package that could export successfully still failed here until email_read was added.
The selector shows:
- Attribute set name
- Source key
- Field count
- Whether the attribute set is marked as sendable in SFMC
Important to know:
Fetch available field sourcescurrently fetches Contact Builder attribute sets from SFMC, not Data Extensions.- A source shown as
Sendablemeans the attribute set hasisSendableset in SFMC. - The
Sendablebadge does not mean the item is a Data Extension. - If SFMC returns
Account / User not authorized for operation, the installed package can authenticate successfully but still lack the Contact Builder access needed for this endpoint. - If export works but
Fetch available field sourcesfails, addemail_readfirst, then verify the package has access to the correct SFMC account or business unit.
Run the field sync in Better Email
Once recipient field sync is enabled:
- Go to
Recipient Fields. - Click
Sync from <integration name>. - Better Email imports the selected fields and creates or updates recipient fields for that integration.
Sync fields from a sendable Data Extension
Better Email can also sync fields from a sendable Data Extension when a sendable_data_extension_key is configured for the integration.
Use this when you want recipient fields to come from a specific sendable Data Extension in addition to, or instead of, Contact Builder attributes.
Current behavior:
- Contact Builder attribute set selection is available in the Better Email integration UI.
- Data Extension syncing is not currently part of the
Fetch available field sourcespicker. - Data Extension syncing still depends on the integration having a
sendable_data_extension_keyconfigured. - If no Data Extension key is configured, Better Email syncs only Contact Builder attribute fields.
If you want to sync Data Extensions instead of, or alongside, Contact Builder attribute sets, collect the relevant sendable Data Extension IDs or keys and share them with the Better Email team so the integration can be configured correctly.
Recommended setup
If your team uses segmentation, recipient-field syncing, or merge tags heavily, test all three flows early after connecting SFMC so you catch permissions or business-unit issues before your first live export.
Related docs
- Integrations
- Merge tags
- Segmentation
- Link input
- Multi-line text
- Keeping your CSS alive in Salesforce Marketing Cloud
For most teams, the smoothest setup looks like this:
- Start with the Contact Builder attribute sets you actually need.
- Limit the sync to the relevant sets instead of syncing everything.
- Add a sendable Data Extension key only when you specifically need Data Extension-based fields in Better Email.
If you are unsure which SFMC sources to use, start with the smallest set that supports your merge tags and segmentation needs, then expand from there.