Braze integration
This guide walks you through setting up the Braze integration in Better Email and exporting your campaigns to Braze as email templates. It also covers two optional features: sending and scheduling campaigns from Better Email, so your editors never need to open Braze, and syncing custom attributes for merge tags and segmentation.
Before you start
To set up the Braze integration, you will need:
- A Braze account with access to create REST API keys
- An admin user in Better Email who can create and edit integrations
1. Create a REST API key in Braze
- In Braze, go to Settings → API and Identifiers
- Select the API Keys tab
- Click Create API key
- Fill in the form:
- API key name:
Better Email integration - Allowlist IPs: Leave blank
- Permissions: Select the permissions listed below for the features you use.
- API key name:
- Click Create API key
Which permissions you need depends on the features you use:
- Exporting campaigns as templates (always):
templates.email.create,templates.email.update - Syncing recipient fields:
custom_attributes.get - Sending and scheduling from Better Email (optional):
messages.send,messages.schedule.create,messages.schedule.update,messages.schedule.delete - Showing segment names instead of IDs (optional):
segments.list - Performance data:
sends.data_series,campaigns.list,campaigns.details,campaigns.data_series,messages.schedule_broadcasts
You don't need campaigns.trigger or canvas.trigger permissions. Better Email sends the email content itself rather than triggering campaigns set up in Braze.
2. Copy your credentials into Better Email
On the API key detail page, Braze shows both values you need:
- Next to REST Endpoint, click the copy icon and paste the value into the Instance URL field in Better Email
- Next to your API key, click the copy icon and paste the value into the API Key field in Better Email
Note: The Instance URL should be a hostname only — do not include
https://. If the copied value includes it, remove it before saving.
3. Save and enable the integration in Better Email
- Go to Integrations in Better Email
- Create a new integration or open an existing one
- Choose Braze as the type
- Paste in the Instance URL and API Key from the previous step
- Check Enabled
- Click Save
The integration is now active and ready to use.
4. Export to Braze
Once the integration is active, you can export campaigns directly to Braze from the export dialog.
- Better Email stores the Braze template ID after the first export
- Re-exporting the same campaign updates the existing template instead of creating a new one
- Merge tags and segmentation are rendered using Braze-compatible syntax
5. Optional: send and schedule from Better Email
Sending from Better Email is optional and off by default. Without it, the Braze integration exports templates and your team sends from Braze as usual.
With it turned on, your editors can send a campaign, schedule it, reschedule it or unschedule it straight from Better Email. Braze still delivers it, so it goes out from your sending domains and Braze's Liquid is resolved per recipient, but nobody needs to log in to Braze to do it.
Turn on sending
- Open the Braze integration in Better Email.
- Turn on
Send and schedule from Better Email. - Click Save.
With the setting off, syncing only updates the email template, as before.
Set up a Destination for each newsletter
Sending settings live on the integration's Destinations, so one Braze integration can serve several newsletters, each with its own audience and sender. Open the Destinations tab, add one Destination per newsletter, and fill in:
| Setting | What it does |
|---|---|
| Braze segments | The segments editors can send this Destination to. Click Fetch from Braze to pick them by name, or add a Segment API Identifier by hand. Sending is blocked until at least one is added. |
| From name and From email | Who the email comes from. The address must be on a sending domain set up in Braze. |
| Reply-to email | Optional. Leave it blank to use your Braze workspace default. |
| App identifier | An App API Identifier from Settings → API and Identifiers in Braze. Some workspaces refuse to send email without one. |
| API campaign ID and Email message variation ID | Optional, but recommended: they make Braze count the sends in its campaign stats, and they are what lets Better Email show performance data for each send. See below. |
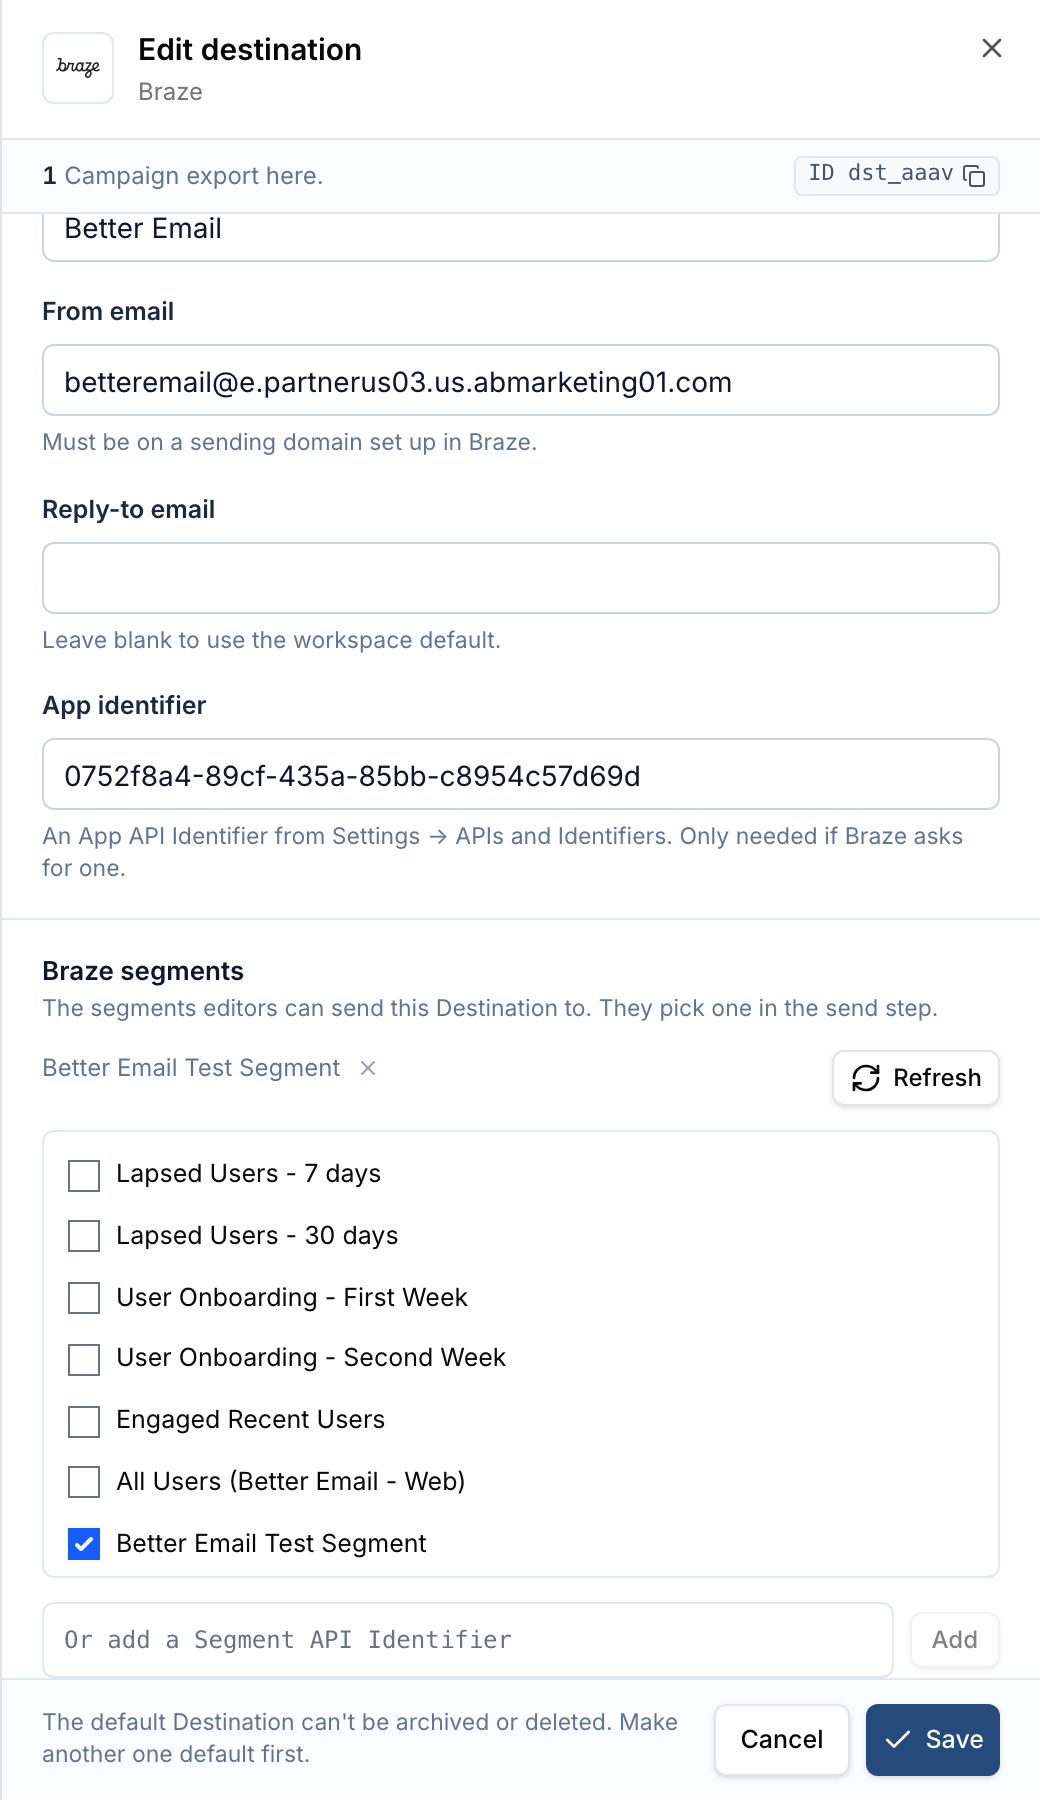
Campaigns pick their Destination when they are created, so choose the newsletter's Destination when you set up a new campaign.
Create an API campaign in Braze
Braze tracks sends made through its API under an API campaign. Create one per newsletter, once:
- In Braze, go to Messaging → Campaigns and click Create campaign.
- Choose API Campaigns, give it the newsletter's name, and add the Email channel.
- Save it, then copy the Campaign ID and the email Message Variation ID (it looks like
email-1234) into the Destination'sAPI campaign IDandEmail message variation IDfields.
Braze requires both together: with a campaign ID and no variation ID, it refuses the send.
Send or schedule a campaign
- Open the campaign's Review tab and click
Sync to <your Braze integration>. - Click
Next. The send step summarises who it goes to, the subject, the preheader and the sender. - Choose what happens:
Sync onlyupdates the email template in Braze. Nothing is sent.Send nowsends to the segment straight away. You confirm it once more before it goes.Schedulesends at the time you pick, in your own time zone. It must be at least two minutes ahead.
- If the Destination has more than one segment, pick the one to send to.
- Click
Send noworSchedule send.
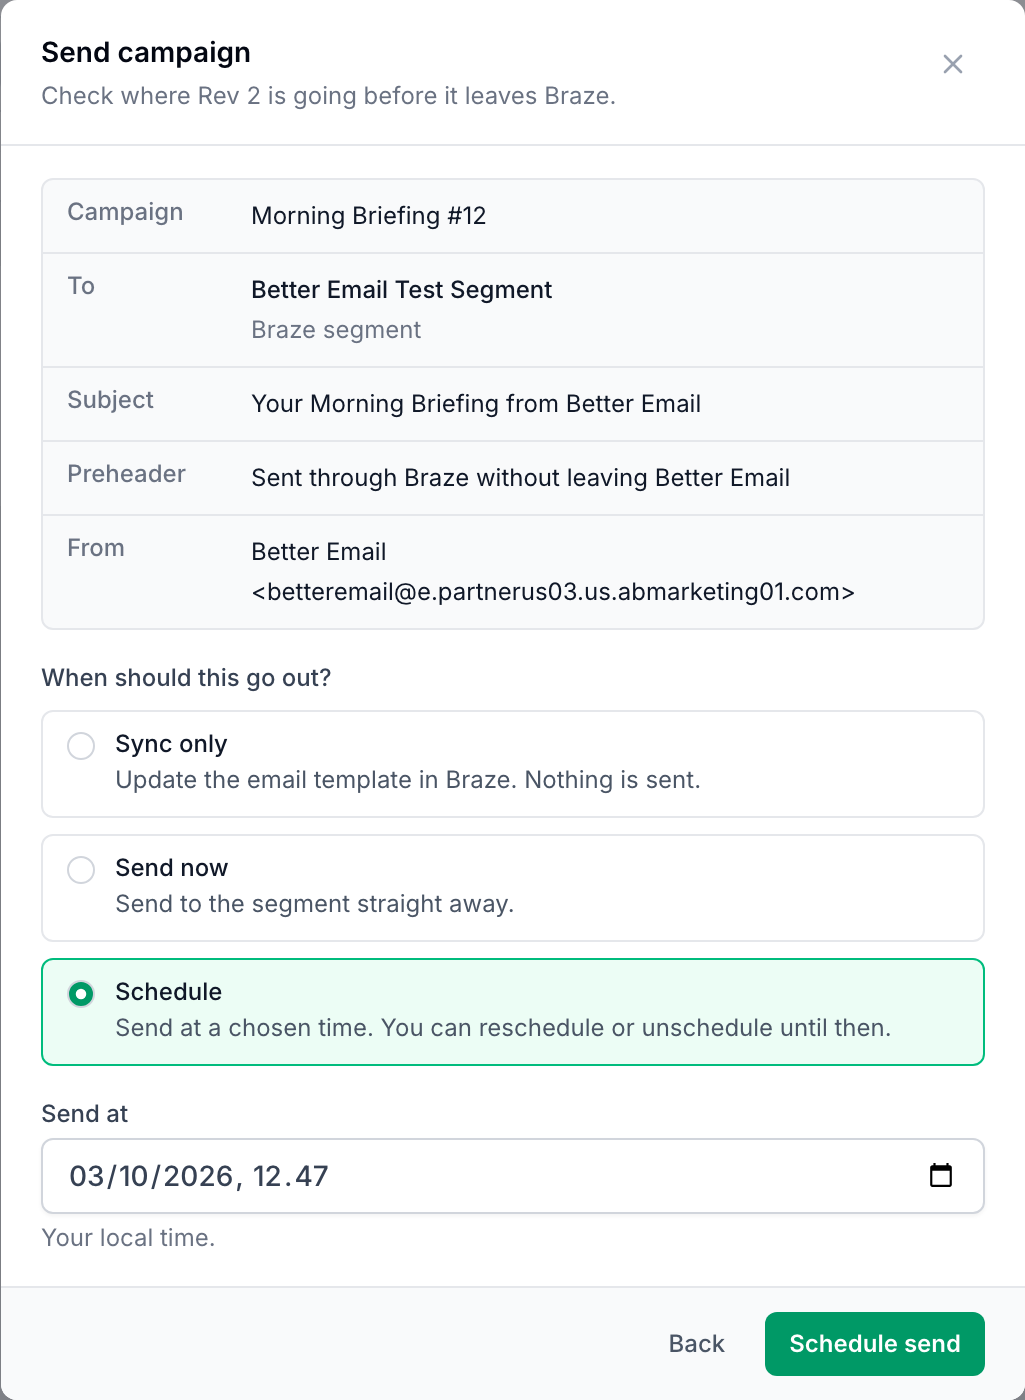
The email that goes out is the revision you are syncing, exactly as rendered, even if the template in Braze is changed later.
Change or cancel a scheduled send
A scheduled campaign shows its send time on the Review tab and in the campaign list.
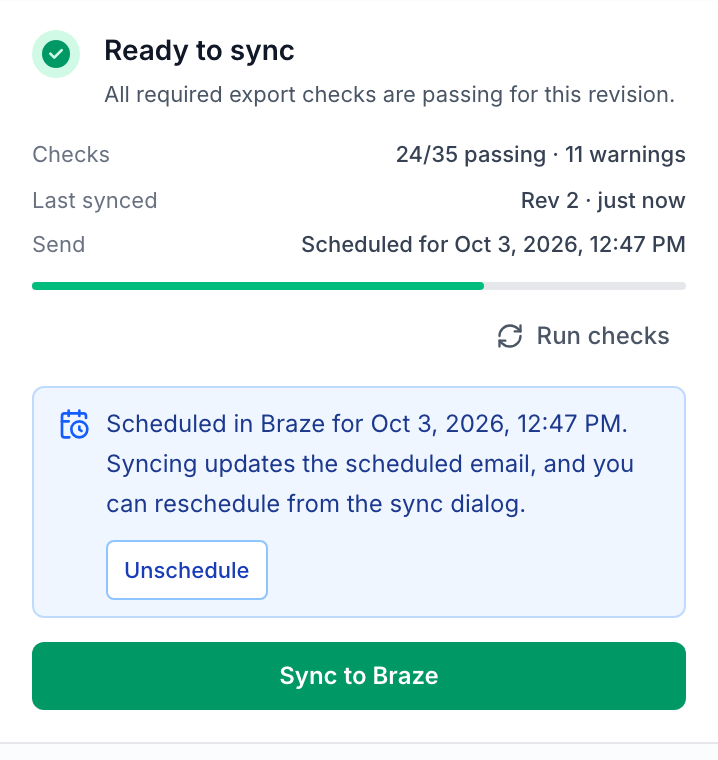
- Update the content: sync the campaign again and choose
Keep the schedule. The scheduled email takes the new revision and still goes out at the same time. - Reschedule: sync again and choose
Rescheduleto pick a new time. - Unschedule: click
Unscheduleon the Review tab. Braze deletes the scheduled send and nothing goes out. You can schedule the campaign again afterwards.
A scheduled send can't be changed in its last minute, because Braze is already preparing it.
After a campaign is sent
A sent campaign can't be synced again, so the record of what went out stays accurate. To send a new version, duplicate the campaign.
If Better Email loses contact with Braze in the middle of a send, it can't tell whether the email went out. The campaign is then marked Send unconfirmed and locked, rather than risking a second send. Check Braze's Message Activity Log to see what happened.
Sends made through Braze's API don't appear in Braze's own campaign calendar while they are scheduled. Better Email keeps track of them, and once a send has gone out it counts towards the API campaign's stats in Braze.
6. Optional: sync recipient fields from Braze
To use Braze custom attributes as merge tags and segmentation in Better Email:
- Open the Braze integration
- Check Sync recipient fields
- Click Save
- Go to Recipient Fields
- Click Sync from [integration name]
Better Email will read the available Braze custom attributes and map them into recipient fields.
7. Using Braze Liquid together with Better Email Liquid
Better Email and Braze both use Liquid, and they render in sequence: Better Email renders the campaign when you export it, and Braze renders the resulting template again for every recipient at send time.
So any Liquid meant for Braze has to survive Better Email's render. Wrap it in {% raw %}...{% endraw %} — Better Email outputs the contents as literal text, and Braze receives the tags intact:
{% raw %}{% catalog_items products 1234 %}{{ items[0].title }}{% endraw %}
Without the raw tags, Better Email evaluates the code itself: {{ items[0].title }} renders as empty, and {% catalog_items %} is not a tag Better Email knows, so the render fails with a Liquid error.
You do not need raw for merge tags. Recipient fields inserted in the Campaign Editor are already exported as {{custom_attribute.${…}}} — Better Email writes that syntax at export. raw is for Braze Liquid you write by hand in the template base or module code.
Injecting Better Email values into Braze Liquid
Nothing inside a raw block is evaluated, including your own settings. To put a Better Email value inside a Braze tag, close the block, output the value, and open a new one:
{% raw %}{% catalog_items products {% endraw %}{{ product_id }}{% raw %} %}{% endraw %}
If product_id is a module setting holding 1234, the exported template reads {% catalog_items products 1234 %} — a Braze tag with the marketer's item id baked in.
Limit it to Braze exports
If the same design system exports to more than one ESP, guard the Braze-specific branch on the integration:
{% if context.integration.type == "BrazeIntegration" %}
  {% raw %}…Braze Liquid…{% endraw %}
{% endif %}
See the render context for the rest of what context exposes.
8. Example: a product recommendation module
Braze catalogs hold product data that Braze looks up at send time, and BrazeAI item recommendations decide which item each recipient should see. Combine that with context.isPreview and you get a module that shows a readable placeholder in the Campaign Editor and a per-recipient product in the delivered email — with nothing for the marketer to fill in.
Create the recommendation in Braze first, then reference it by name:
{% if context.isPreview %}

  {% comment %} Placeholder so the marketer can see the layout {% endcomment %}
  <table role="presentation" width="280" cellpadding="0" cellspacing="0" border="0" style="font-family: sans-serif;">
    <tr>
      <td height="180" style="background:#eeeeee; text-align:center; font-size:12px; color:#888888;">Recommended product image</td>
    </tr>
    <tr><td style="padding-top:12px; font-size:16px; font-weight:bold;">Recommended product name</td></tr>
    <tr><td style="padding-top:4px; font-size:14px;">$0.00</td></tr>
    <tr><td style="padding-top:12px; font-size:14px;"><a href="#">Shop now</a></td></tr>
  </table>

{% else %}

  {% raw %}
    {% assign items = {{product_recommendation.${homepage_recs}}} %}
    {% if items.size > 0 %}
      {% assign product = items[0] %}
      <table role="presentation" width="280" cellpadding="0" cellspacing="0" border="0" style="font-family: sans-serif;">
        <tr>
          <td>
            <a href="{{ product.url }}"><img src="{{ product.image_url }}" width="280" alt="{{ product.title }}" style="display:block; width:100%; max-width:280px;" /></a>
          </td>
        </tr>
        <tr><td style="padding-top:12px; font-size:16px; font-weight:bold;">{{ product.title }}</td></tr>
        <tr><td style="padding-top:4px; font-size:14px;">{{ product.price }}</td></tr>
        <tr><td style="padding-top:12px; font-size:14px;"><a href="{{ product.url }}">Shop now</a></td></tr>
      </table>
    {% endif %}
  {% endraw %}

{% endif %}
What is doing what:
- The whole
elsebranch belongs to Braze, so one{% raw %}wrapper covers it — no seam needed. Note the{{ … }}nested inside{% assign %}: that is valid Braze Liquid, but Better Email cannot parse it, so therawwrapper is what makes it work at all. homepage_recsis the name of the recommendation you set up in Braze. Braze resolves it per recipient at send time, so the marketer never picks a product.title,price,image_url, andurlare column names in your Braze catalog. Use whatever your catalog actually defines.{% if items.size > 0 %}runs in Braze at send time, so a recipient with no recommendation gets nothing rather than a broken card. Add a fallback there if you want one.- The preview branch is all the marketer ever sees in the editor. Without it, they would be looking at raw Braze tags instead of a product card.
Other ways to choose the item
The rest of the module stays the same — only the line that produces items changes:
{% raw %}{% catalog_selection_items products best_sellers %}{% endraw %}— Braze filters the catalog per recipient using a selection you define on the catalog's columns.{% raw %}{% catalog_items products {{custom_attribute.${last_viewed_product_id}}} %}{% endraw %}— the item id comes from a custom attribute stored on the Braze user.{% raw %}{% catalog_items products {% endraw %}{{ product_id }}{% raw %} %}{% endraw %}— the marketer picks the product in a Better Email setting, injected through the seam from section 7.
Performance data
Better Email can show how your Braze sends performed: sends, deliveries, opens, clicks, bounces, unsubscribes and spam complaints. That covers both campaigns sent from Better Email and campaigns your team builds in Braze from a synced template. See Performance data from Braze.
Troubleshooting
| Symptom | Fix |
|---|---|
| The sync dialog has no send step | Turn on Send and schedule from Better Email on the integration |
| "Set a segment and a from address on this Destination before sending" | Add at least one segment and a From email to the campaign's Destination |
| "Braze refused the send: Invalid app id" | Add an App identifier to the Destination |
| "Braze refused the send: Message variant unspecified" | The Destination has an API campaign ID but no Email message variation ID. Copy the variation ID from the API campaign in Braze |
| "Braze refused the send: Access Denied" | The API key is missing a sending permission. Check the permissions table |
Fetch from Braze shows an error | The API key needs segments.list. Add the Segment API Identifier by hand instead, or add the permission |
Failed to open TCP connection to https:443 | The Instance URL contains https:// — remove the protocol prefix and enter the hostname only |
Name or service not known | The Instance URL is incorrect — copy it again from the REST Endpoint field on your API key page in Braze |
| Export fails | Verify that the integration is enabled and that the API key has Email and Templates permissions |
| API key rejected | The key may have been deleted in Braze — create a new one and update the integration |