For admins
Performance data from Salesforce Marketing Cloud
Better Email can show how the emails you build actually perform after they are sent from Salesforce Marketing Cloud (SFMC): sends, deliveries, opens, clicks, bounces, unsubscribes, top clicked links, and how engagement develops in the hours after a send.
This guide explains what data is involved, which SFMC permissions are needed, and how to set everything up. It assumes you have already connected SFMC to Better Email.
For what the finished result looks like and how to read it, see Campaign performance.
Your subscriber data stays in Marketing Cloud
Before anything else, the most important thing to know:
Better Email never receives, processes, or stores subscriber-level data. No email addresses, no subscriber keys, no per-recipient events.
All numbers are aggregated per campaign send. For the extended metrics, the aggregation happens inside your own Marketing Cloud account using standard Automation Studio SQL queries — only the finished totals (counts, link URLs, and send metadata such as subject lines) are read by Better Email.
A useful side effect: because Better Email only reads campaign-level totals, API usage stays tiny and predictable — roughly 20–30 API requests per day, whether you send a thousand emails or ten million.
Two levels of performance data
You can enable performance data in two steps, depending on what access your SFMC team is comfortable granting:
| Basic | Extended | |
|---|---|---|
| Sent, delivered, unique opens, unique clicks, unsubscribes | ✓ | ✓ |
| Bounces and spam complaints | ✓ | |
| Total vs. unique opens and clicks | ✓ | |
| Clicks per link ("top clicked links") | ✓ | |
| Engagement timeline after each send | ✓ | |
| SFMC setup required | API permissions only | One Automation Studio automation |
Basic works with read-only API permissions on the installed package you already use for the Better Email integration — nothing else to set up in SFMC.
Extended additionally requires a small automation in your SFMC account (three SQL queries writing into three Data Extensions). You can create it yourself following the steps below, or grant Better Email temporary permissions to create it for you.
SFMC permissions
On the installed package used by your Better Email integration (Setup → Installed Packages → your package → API Integration → Edit), make sure these scopes are enabled:
| Scope | Needed for |
|---|---|
| Email — Read | Send metadata (email name, subject, sender) and rollup counters |
| Tracking Events — Read | Performance counters on send jobs |
| Data Extensions — Read | Reading the three aggregate tables (Extended) |
| List and Subscribers — Read | Business unit context |
| Automation — Read | Verifying the automation setup (Extended) |
If you want Better Email to create the automation for you (assisted setup), also enable these temporarily:
| Scope | Needed for |
|---|---|
| Data Extensions — Write | Creating the three aggregate Data Extensions |
| Automation — Write, Execute | Creating and running the automation and its queries |
You can remove the write scopes again once setup is complete — ongoing syncing only ever reads.
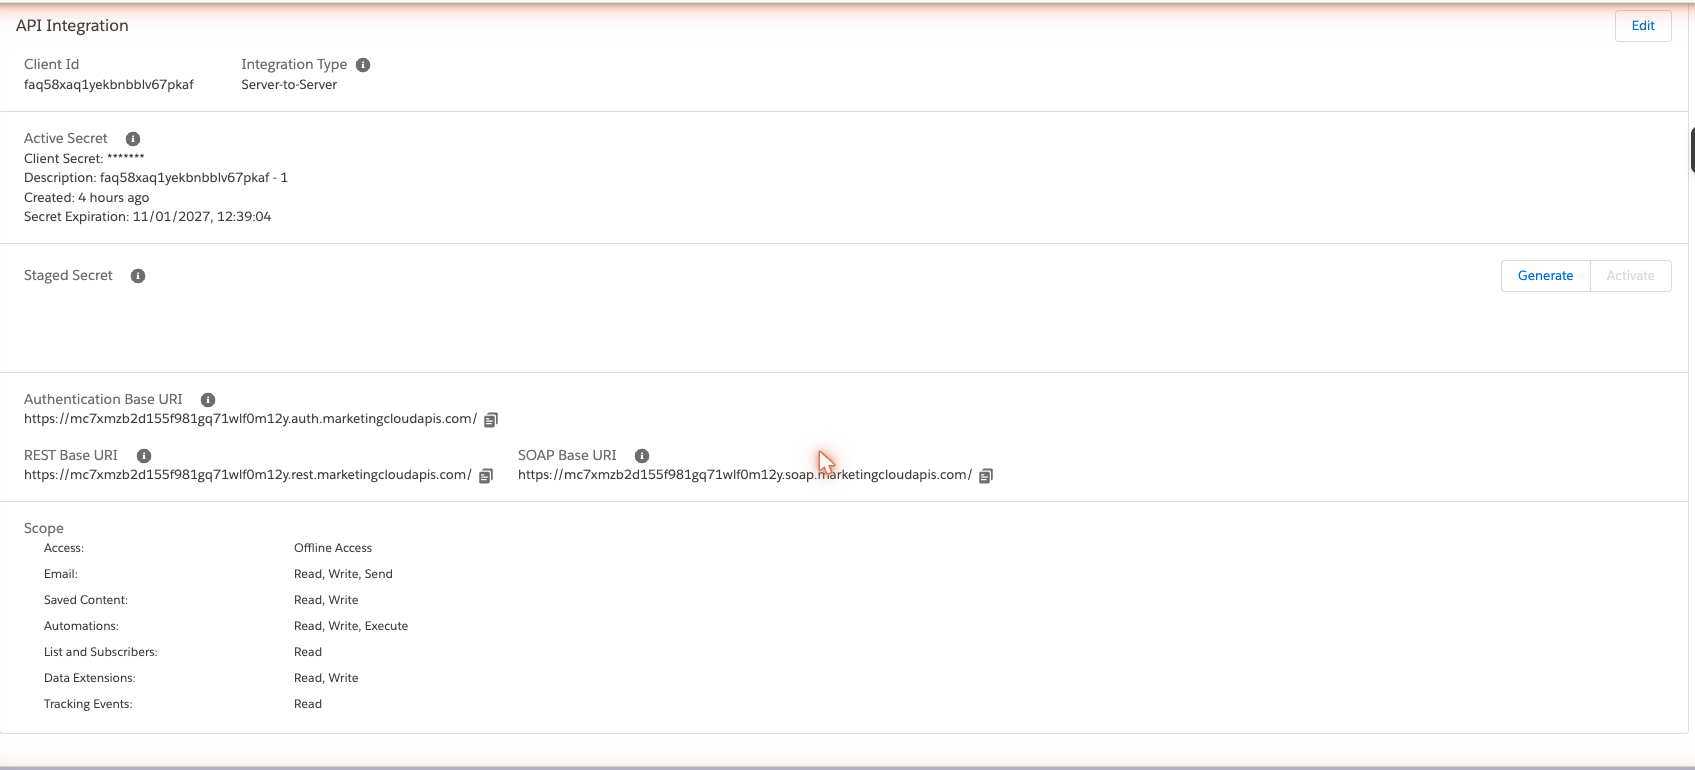
Scope changes can take a minute or two to become active on new API tokens. If Better Email still reports missing permissions right after you saved, wait a moment and try again.
Enable performance data in Better Email
- Open your SFMC integration in Better Email.
- Turn on
Sync performance data. - If you have set up (or plan to set up) the automation below, also turn on
Extended performance data. - Save the integration.
Better Email refreshes performance data about once an hour. Basic metrics appear after the first sync; extended metrics appear once the automation in your SFMC account has run at least once.
Set up extended performance data
Extended metrics come from three small Data Extensions that a scheduled automation refreshes inside your Marketing Cloud account. Each refresh replaces the contents with aggregates for sends from the last 30 days.
There are two ways to create them:
- Assisted (recommended): enable the write scopes listed above and ask your Better Email contact to run the setup. Everything below is created automatically — you only schedule the automation afterwards and can then remove the write scopes.
- Manual: an SFMC user creates the objects by hand, following the rest of this section.
1. Create three Data Extensions
Create these in Email Studio → Subscribers → Data Extensions (any folder is fine). None of them are sendable, and no retention policy is needed. The external key must exactly match the name.
BE_Perf_JobSummary — one row per send:
| Field | Type |
|---|---|
| JobID | Number |
| EmailName | Text (200) |
| EmailSubject | Text (300) |
| FromName | Text (200) |
| FromEmail | Text (254) |
| SentTime | Date |
| SentTotal | Number |
| BouncesTotal | Number |
| OpensTotal | Number |
| OpensUnique | Number |
| ClicksTotal | Number |
| ClicksUnique | Number |
| UnsubsTotal | Number |
| ComplaintsTotal | Number |
BE_Perf_LinkClicks — one row per link per send:
| Field | Type |
|---|---|
| JobID | Number |
| URL | Text (900) |
| LinkName | Text (200) |
| ClicksTotal | Number |
| ClicksUnique | Number |
BE_Perf_Timeline — one row per 3-hour engagement bucket per send:
| Field | Type |
|---|---|
| JobID | Number |
| EventKind | Text (10) |
| BucketIndex | Number |
| EventCount | Number |
2. Create three SQL Query Activities
In Automation Studio → Activities, create a SQL Query activity for each Data Extension. Set the target to the matching Data Extension and the data action to Overwrite.
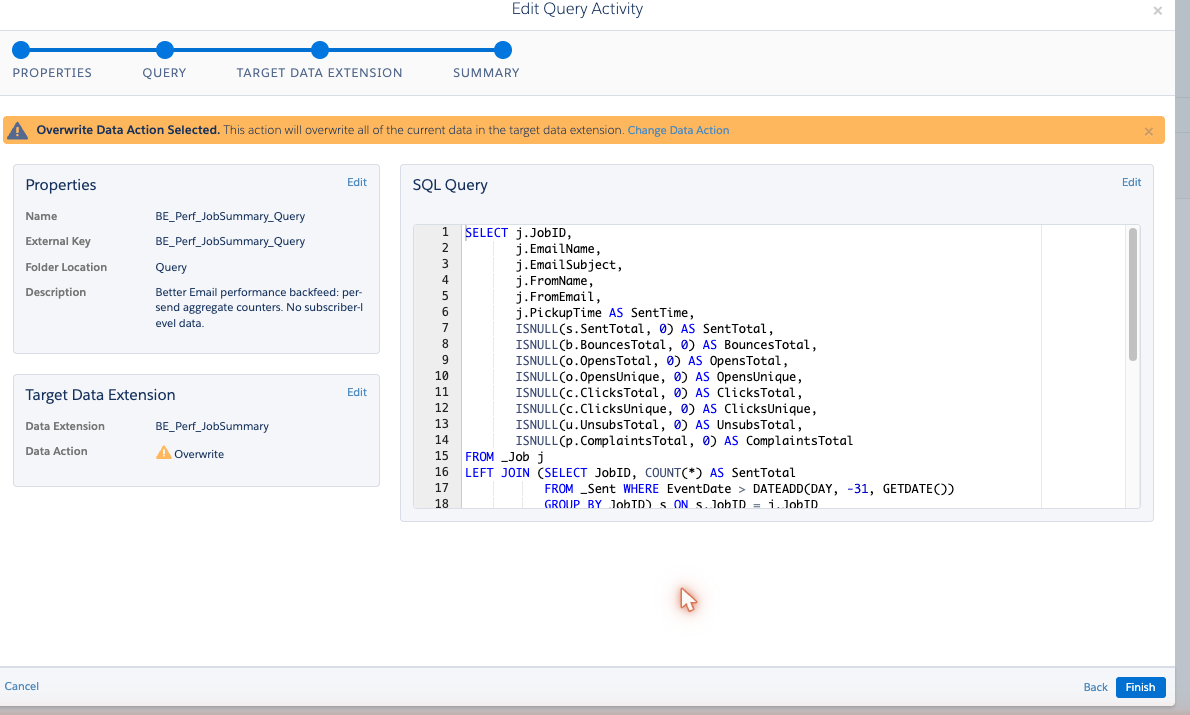
BE_Perf_JobSummary_Query → targets BE_Perf_JobSummary:
SELECT j.JobID,
       j.EmailName,
       j.EmailSubject,
       j.FromName,
       j.FromEmail,
       j.PickupTime AS SentTime,
       ISNULL(s.SentTotal, 0) AS SentTotal,
       ISNULL(b.BouncesTotal, 0) AS BouncesTotal,
       ISNULL(o.OpensTotal, 0) AS OpensTotal,
       ISNULL(o.OpensUnique, 0) AS OpensUnique,
       ISNULL(c.ClicksTotal, 0) AS ClicksTotal,
       ISNULL(c.ClicksUnique, 0) AS ClicksUnique,
       ISNULL(u.UnsubsTotal, 0) AS UnsubsTotal,
       ISNULL(p.ComplaintsTotal, 0) AS ComplaintsTotal
FROM _Job j
LEFT JOIN (SELECT JobID, COUNT(*) AS SentTotal
           FROM _Sent WHERE EventDate > DATEADD(DAY, -31, GETDATE())
           GROUP BY JobID) s ON s.JobID = j.JobID
LEFT JOIN (SELECT JobID, COUNT(*) AS BouncesTotal
           FROM _Bounce WHERE EventDate > DATEADD(DAY, -31, GETDATE())
           GROUP BY JobID) b ON b.JobID = j.JobID
LEFT JOIN (SELECT JobID, COUNT(*) AS OpensTotal,
                  SUM(CASE WHEN IsUnique = 1 THEN 1 ELSE 0 END) AS OpensUnique
           FROM _Open WHERE EventDate > DATEADD(DAY, -31, GETDATE())
           GROUP BY JobID) o ON o.JobID = j.JobID
LEFT JOIN (SELECT JobID, COUNT(*) AS ClicksTotal,
                  SUM(CASE WHEN IsUnique = 1 THEN 1 ELSE 0 END) AS ClicksUnique
           FROM _Click WHERE EventDate > DATEADD(DAY, -31, GETDATE())
           GROUP BY JobID) c ON c.JobID = j.JobID
LEFT JOIN (SELECT JobID, COUNT(*) AS UnsubsTotal
           FROM _Unsubscribe WHERE EventDate > DATEADD(DAY, -31, GETDATE())
           GROUP BY JobID) u ON u.JobID = j.JobID
LEFT JOIN (SELECT JobID, COUNT(*) AS ComplaintsTotal
           FROM _Complaint WHERE EventDate > DATEADD(DAY, -31, GETDATE())
           GROUP BY JobID) p ON p.JobID = j.JobID
WHERE j.PickupTime > DATEADD(DAY, -30, GETDATE())
BE_Perf_LinkClicks_Query → targets BE_Perf_LinkClicks:
SELECT c.JobID,
       c.URL,
       MAX(c.LinkName) AS LinkName,
       COUNT(*) AS ClicksTotal,
       COUNT(DISTINCT c.SubscriberKey) AS ClicksUnique
FROM _Click c
JOIN _Job j ON j.JobID = c.JobID
WHERE j.PickupTime > DATEADD(DAY, -30, GETDATE())
  AND c.EventDate > DATEADD(DAY, -31, GETDATE())
GROUP BY c.JobID, c.URL
BE_Perf_Timeline_Query → targets BE_Perf_Timeline:
SELECT x.JobID, x.EventKind, x.BucketIndex, COUNT(*) AS EventCount
FROM (
  SELECT o.JobID,
         'open' AS EventKind,
         DATEDIFF(MINUTE, j.PickupTime, o.EventDate) / 180 AS BucketIndex
  FROM _Open o
  JOIN _Job j ON j.JobID = o.JobID
  WHERE j.PickupTime > DATEADD(DAY, -30, GETDATE())
    AND o.EventDate >= j.PickupTime
    AND o.EventDate <= DATEADD(DAY, 7, j.PickupTime)
  UNION ALL
  SELECT c.JobID,
         'click' AS EventKind,
         DATEDIFF(MINUTE, j.PickupTime, c.EventDate) / 180 AS BucketIndex
  FROM _Click c
  JOIN _Job j ON j.JobID = c.JobID
  WHERE j.PickupTime > DATEADD(DAY, -30, GETDATE())
    AND c.EventDate >= j.PickupTime
    AND c.EventDate <= DATEADD(DAY, 7, j.PickupTime)
) x
GROUP BY x.JobID, x.EventKind, x.BucketIndex
The queries only read SFMC's standard tracking data views (_Job, _Sent, _Open, _Click, _Bounce, _Unsubscribe, _Complaint). Where a query touches SubscriberKey, it is only used inside a COUNT(DISTINCT ...) — the subscriber identity never leaves Marketing Cloud, only the resulting count is written to the Data Extension.
3. Create and schedule the automation
In Automation Studio:
- Create a new automation named
Better Email performance aggregates(external keyBE_Perf_Aggregates). - Use a
Schedulestarting source. - Add one step containing all three query activities.
- Set the schedule to run hourly and activate it.
- Run the automation once so the Data Extensions are filled right away.
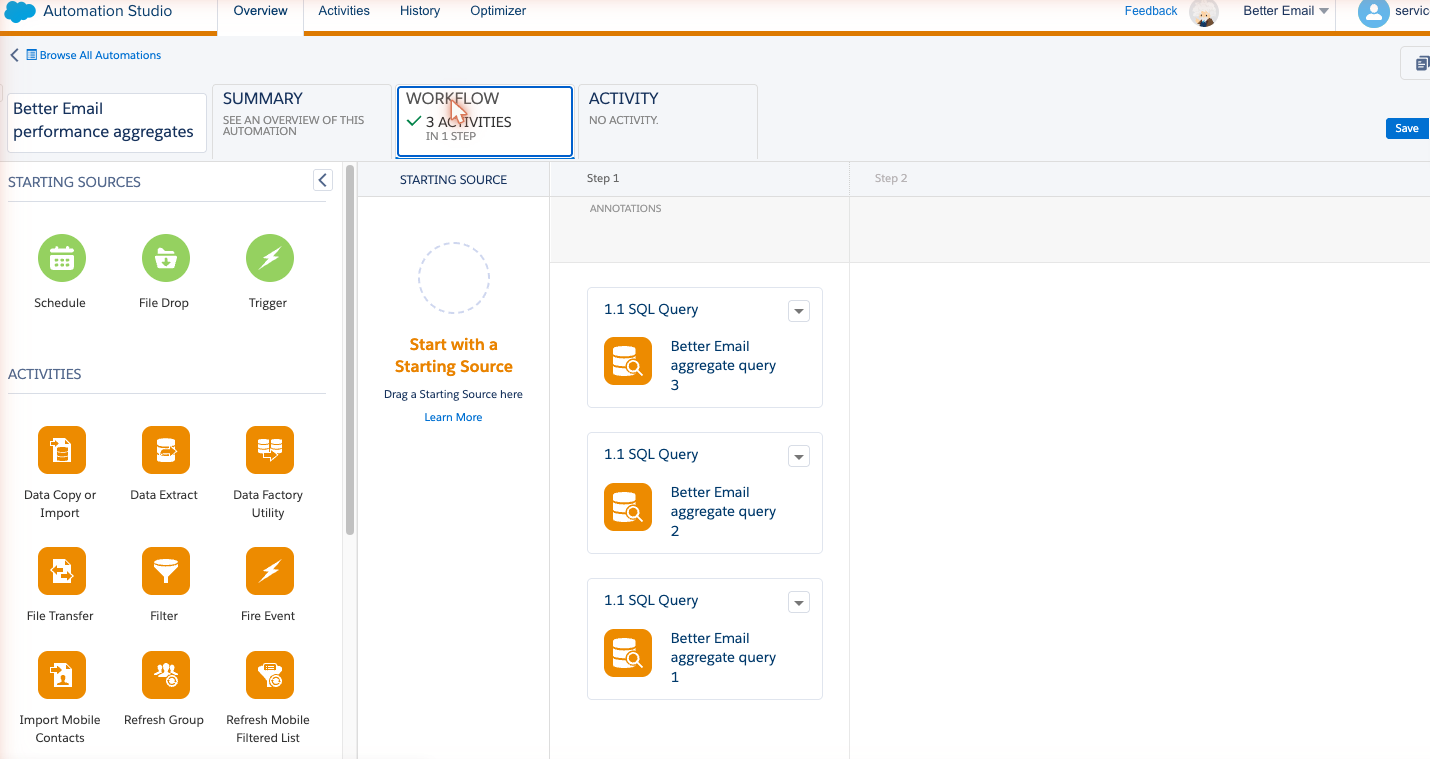
The automation typically completes in well under a minute. Because each run replaces the Data Extension contents, it is safe to run it as often as you like.
4. Check that it works
After the automation has run once and Extended performance data is enabled in Better Email, the next sync picks up the extended metrics automatically. If a recent send shows bounces, complaints, per-link clicks, and an engagement timeline in Better Email, everything is connected.
Troubleshooting
Only the basic metrics show up. The automation has not run yet, is not scheduled, or one of the Data Extensions has a different external key than its name. Check the automation's run history in Automation Studio, and verify the three Data Extension keys are exactly BE_Perf_JobSummary, BE_Perf_LinkClicks, and BE_Perf_Timeline.
No performance data at all. Check that Sync performance data is enabled on the integration in Better Email, and that the installed package has the read scopes listed above. Scope changes take a minute or two to reach new API tokens.
A query activity fails in Automation Studio. Check that the target Data Extension exists with the exact field names and types listed above, and that the data action is set to Overwrite.
Numbers differ slightly from SFMC reports. Opens and clicks keep accruing after a send, and the two systems may have refreshed at different times. Better Email refreshes hourly; the automation refreshes on your schedule. Metrics for a send stop updating 30 days after it was sent.
Good to know
- Performance data covers sends from the last 30 days at the time the feature is enabled, and keeps history for everything synced after that.
- Metrics for a send keep refreshing while it is inside that 30-day window, so opens and clicks that arrive days after a send are still counted.
- The engagement timeline covers the first 7 days after each send, in 3-hour intervals.